Saturday, June 28, 2003
I'm trying to add more ruins and obstacles in the open areas to make more interesting battles. I think the ruins I'm working on now will make for some interesting battles. This is where the truck is located, and will have the staff of Ra in or near the truck at first. The allies will have to take the staff to the temple in order to open up some doors which lead to the idol.
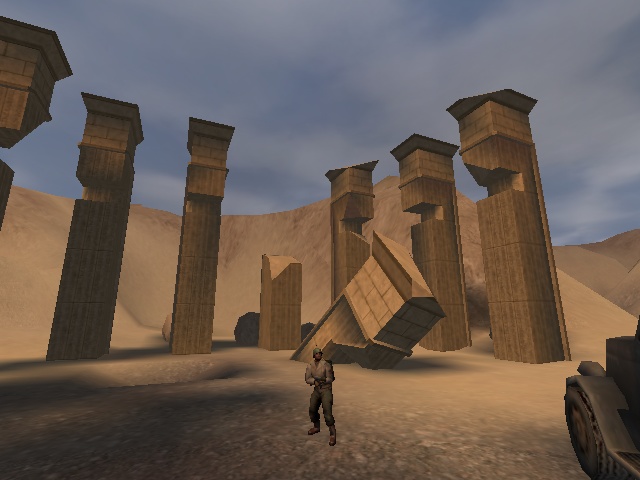
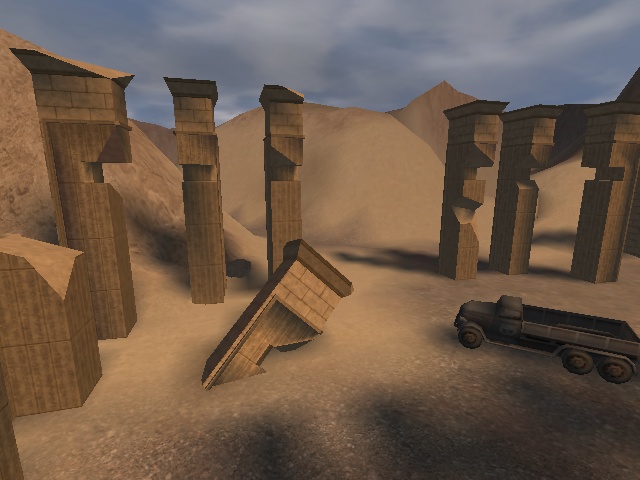
Here are some more screens as well: Ruins 2 | Ruins 3 |Ruins 4 |Ruins 5
On the last picture, you can see that I'm also modeling some boulders. They literally took five minutes to make in Max. Just a smoothed cube, with a twist then some hand pulling of vertecies.
All the funky rotation broken stuff you see, like the fallen pillars are brushwork, exported as ASE models and rotated, which is the best thing since sliced bread.
Posted by Hummer @ 08:14 PM PST [Link] [No Comments]
Friday, June 27, 2003

Modeled after this. I couldn't help myself. I'm havin' to much run with the Egyptian ruins stuff. Okay, bed time.
Posted by Hummer @ 01:45 AM PST [Link] [No Comments]
Thursday, June 26, 2003

I'm starting to toy with brush work. The terrain is *mostly* done, although, there still some places where the alphamap needs to line up better, places where players shouldn't be able to go, etc. All of the paths and such have been created though. I love going up on the little ridges and looking down over the terrain.
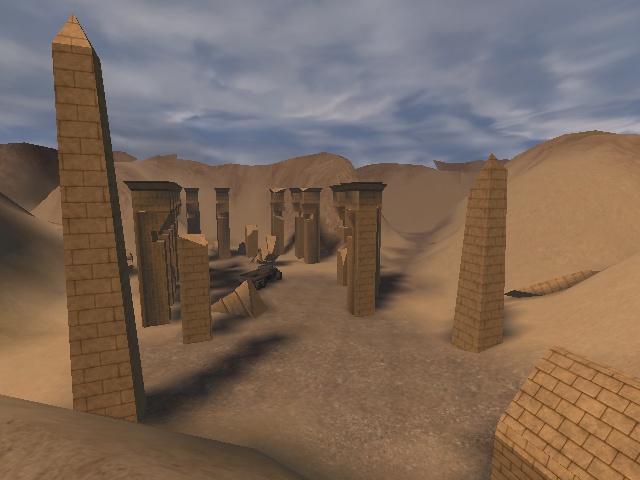
The above architecture was modeled from this and this. The brushwork is pretty geometrical now, but I think what I'd like to do is make it look more worn down, turn it into an ase model, the roate it about 35 degrees or so. Also, I'm thinking that the road that leads into either the axis base, or the under ground ruins needs this in front. I love the grandeur of Egyptian architecture...
Anyway here's some more pics:
Posted by Hummer @ 11:41 PM PST [Link] [No Comments]
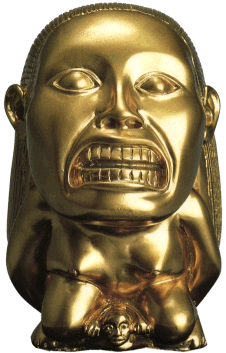
I was bored and modeled the staff of Ra which will be a vital peice to this map.This site has an explanation of it, along with the pictures I used to skin it.

Final result took me under an hour. You can get some other screens here and here.
Posted by Hummer @ 03:35 AM PST [Link] [No Comments]
Wednesday, June 25, 2003
Lightmapped terrain is working!

Terrain Picture 2 | Terrain Picture 3 | Terrain Picture 4
I love running around in this. So fun. Okay, next will be adjuting the alpha map, fixing blending issues, adding detail overlays, then manipulating the terrain in Radiant. Yay!
Also, thanks to Pazur for helping me resolve the external lightmap issue.
Posted by Hummer @ 04:34 PM PST [Link] [No Comments]
Okay. I need to get out more:
Terrain Screen 1 | Terrain Screen 2 | Terrain Screen 2 | Terrain Screen 4 | Terrain Screen 5
The first 4 are some screens just running around a bit. The last one is the entire terrain from above, with an overlay ala my last post. Blue are the possible gun nests, purple are the possible dynamite areas. The dotted lines are the truck routes. Everything else should be easy to figure out :) Note the terrain is using a orangish sky shader, and the terrain is vertex lit at the moment.
Compare Terrain Screen 5 with the Height Map Overlay and the Original Topographical map. Pretty cool, huh?
Okay. I'm going out tonight to a comedy club... I felt like I had to get something done :)
Posted by Hummer @ 04:08 AM PST [Link] [No Comments]
EDIT: Here's a small tuoruial for would be terrain editors:
Eagy Gen Steps:
1. Import your bitmap (128 x 128).
2. Uncheck "Lock terrain..."
3. Enter 256 x 256 for division width and height.
4. Set the width of your terrain, divisible by 256. For example, 12288 x 12288.
5. Check "Lock terrain..."
6. Divide Your terrain width by 256. 12288 / 256 = 48, for example.
7. Enter the quotient as your divisions. I would put in 48 x 48.
8. Play with height as necessary. Again, I stick with multiples of 256, for ease of use in Radiant. I guess multiples of eight would work as well, since that's the default unit size in radiant.
Hope this stream lines your EasyGen work :)
Here's what I've been working on:
While I'm not sure about the dynamiteable routes, I think they might be necessary to allow the allies a bit more freedom in attaining their objective. Otherwise, the Axis might have an easy time camping. Basically, blowing either side would open up the tunnel, and inside might be a command post or something.
There would probably only be one set of dynamitable routes, not both.
Also, I was thinking about where mg42 nests might go. I placed a few on the map, to see if I liked the feel of them.
The truck route is also outlined here. This is the path it will follow most likley. The key in the corner gives more detail about that.
Really, I made only a few changes to make the routes a bit cleaner. Now there are actual routes vs having everything very open. At the moment, I'm working on the alphamap and texturing the terrain using the textures that came with ET.
Posted by Hummer @ 12:37 AM PST [Link] [No Comments]
Tuesday, June 24, 2003
Okay... I did the boulder and got the idols looking brighter:
I basically told the model not to allow shadow casting on itself for now. Looks better this way I think... more bright.
I might make the boulder texture repeat more... thats about it though.
The reason there are two idols, is the one on the left is an md3... the one one the right is an ase. The boulder is also and md3. This is because they will be moving, interactive objects at some point. Remember that anything with motion or interactive must be an md3.
Posted by Hummer @ 02:41 AM PST [Link] [2 comments]
Ok, my battle with terrain begins.
I took the topography I drew and overlayed a heightmap in photoshop. It still needs some tweaking, but here's a screen of the first run:
Nothing super special. Just a some terrain with a uniform (boring and crappy texture). The entire terrain is around 13000 tris. This is a bit too much I think. I could shave off a few tris here and there... maybe expand the terrain a bit more. But at least I'm working on it :)
I think the terrain's size feels right, considering there's going to be a sub base and a underground / cavernous area. The open space in the middle I'm starting to see as a ruins area more than a tent like depot. Who knows. One thing I do like is seeing the terrain pop out of 2d into 3d. Always cool being able to run around in my drawings :)
One thing I want to check is the triangle size of the standard ET maps. On this terrain, each triangle pair is shy of 128 x 128. It seems like Fuel Dumps are a bit larger than that.
Posted by Hummer @ 02:10 AM PST [Link] [1 Comment]
Monday, June 23, 2003
I decided to go with a higher poly model since players will be interacting with it.
Here are the screens of the newer version:
Same model, slightly updated skin... had to alter it a bit to flow better over the model. Just some basic photoshop adjustments.
Had to re-uv map it since the polys were all in a different place.
The lighting looks sorta bad on it... somewhat jaggy. I think I'll apply a shader to it later. Also it's an ASE now.. I'll have to change it to an MD3 at some point.
Posted by Hummer @ 02:33 PM PST [Link] [No Comments]
In the little free time I've had, I've been learing 3ds Max. While I do have some experience with it, I haven't done much in the poly modeling department. So... over the past two days, here's what I've done:
Yep... that's the Idol from raiders.
First I modeled the thing in 3d. I found that poly modeling wasn't terribly tough to get the hang of. I modeled the thing on my first try, within a few hours. Optomizing it took a little effort however. Of course, skinning it took another day.
I had to figure out UV mapping. This site helped immensley. I ended up selecting all the polys on a side of the model, used plannar map to flatten it out un the UV mapping window, then took a screen shot of it. Then, I found images of the front, back and sides of the model through Googles image search. In Photoshop, I matches all the colors of the images to a more golden color (like the front shot), then I scaled, rotated and overlayed those shots on top of the screen shot I took of the UV map.
Finally, In Max, I tweaked the UV map to fit the skin a bit better. Not bad for a first try, eh?
I feel a lot more confident in my modeling abilites now. Although that was my first attempt, I think my skills in radiant helped quite a bit in making the transition. I really love playing with this. I may make the staff / medallion and ark next.
Posted by Hummer @ 01:02 AM PST [Link] [No Comments]