[Previous entry: "Boulders... and even Better Idols."] [Main Index] [Next entry: "Terrain... day 2.5"]
06/25/2003 Archived Entry: "Terrain... day 2."
EDIT: Here's a small tuoruial for would be terrain editors:
Eagy Gen Steps:
1. Import your bitmap (128 x 128).
2. Uncheck "Lock terrain..."
3. Enter 256 x 256 for division width and height.
4. Set the width of your terrain, divisible by 256. For example, 12288 x 12288.
5. Check "Lock terrain..."
6. Divide Your terrain width by 256. 12288 / 256 = 48, for example.
7. Enter the quotient as your divisions. I would put in 48 x 48.
8. Play with height as necessary. Again, I stick with multiples of 256, for ease of use in Radiant. I guess multiples of eight would work as well, since that's the default unit size in radiant.
Hope this stream lines your EasyGen work :)
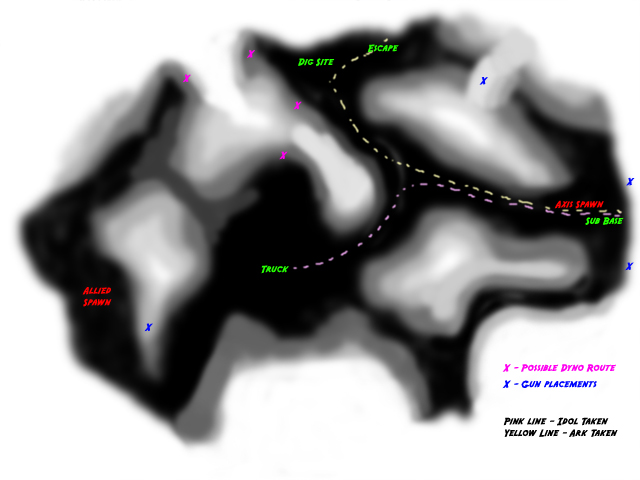
Here's what I've been working on:
While I'm not sure about the dynamiteable routes, I think they might be necessary to allow the allies a bit more freedom in attaining their objective. Otherwise, the Axis might have an easy time camping. Basically, blowing either side would open up the tunnel, and inside might be a command post or something.
There would probably only be one set of dynamitable routes, not both.
Also, I was thinking about where mg42 nests might go. I placed a few on the map, to see if I liked the feel of them.
The truck route is also outlined here. This is the path it will follow most likley. The key in the corner gives more detail about that.
Really, I made only a few changes to make the routes a bit cleaner. Now there are actual routes vs having everything very open. At the moment, I'm working on the alphamap and texturing the terrain using the textures that came with ET.
![]()